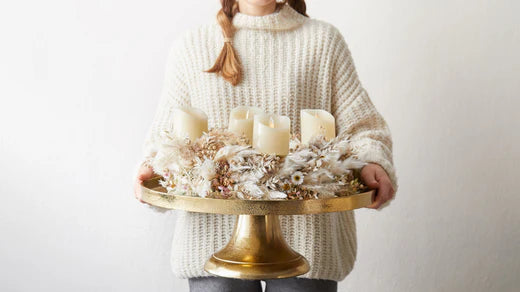
The decoration bang of the season: our homemade Advent wreath made from trendy dried flowers.
IT'S EASY TO COPY WITH OUR DIY INSTRUCTIONS
The impatient wait for Christmas Eve begins four weeks before Christmas. In order to sweeten the waiting for us and especially the children, the theologian Johann Hinrich Wichern allegedly invented the Advent wreath in the 19th century. Since then it has been the custom to light a candle on the Advent wreath on the four Sundays of Advent before the 24th and to get together with family and friends.
So that you don't have to think long about which creation you can use to make this year's Advent season even more beautiful, we have come up with a super stylish variant made from dried flowers and grasses. And because pictures are sometimes worth a thousand words, here are our step-by-step instructions in pictures (and words 😊). It will certainly be very easy for you to imitate it at home.
Have fun decorating!
BEFORE YOU START: GOOD PREPARATION IS EVERYTHING

Good planning is half the battle. That is why we have nicely placed the things you need for handicrafts here.
You will need the following utensils for the dried flower Advent wreath:
- 1 x floral foam ring
- 1 x scissors ( tip: secateurs are best)
- Dried flowers and grasses of your choice (for our Advent wreath we used the following: various types of pampas grass, hydrangeas, daisies, flax, ruscus (butcher's broom))
- 4 candles ( Tip: Due to the high risk of fire, we recommend using LED candles.)
- 4 candle plates (of course without a mandrel if you use LED candles)
- Coffee for a short, creative break in between
HERE WE GO! HERE ARE OUR STEP-BY-STEP INSTRUCTIONS:

Shorten the dried flowers to a length of approx. 10 cm.

Now tie small bouquets (approx. 10 cm long) from the flowers and grasses you have.

Then stick bouquet by bouquet, piece by piece, along the ring in the floral foam.
Tip: The arrangements hold best when you stick the individual flowers and grasses sideways in the foam.

Tip: Use plump grasses such as pampas grass as a basis to optimally cover the floral foam ring. Also, don't forget to cover the edges of the ring as well.

It helps to think about the course of the flowers and grasses in advance and to keep this order for a harmonious picture - more or less.

Individual flowers, such as the daisies and flax here, can be evenly distributed here and there afterwards.

Finished decorated? Then put the candle plates in the foam.

Finally, distribute the candles. Since dried flowers are known to pose a high risk of fire, you should use the safe variant "LED candles". There are now specimens that look deceptively real and even conjure up atmospheric candlelight.

